목차 (클릭시 해당 목차로 이동)
컨트롤러 연결
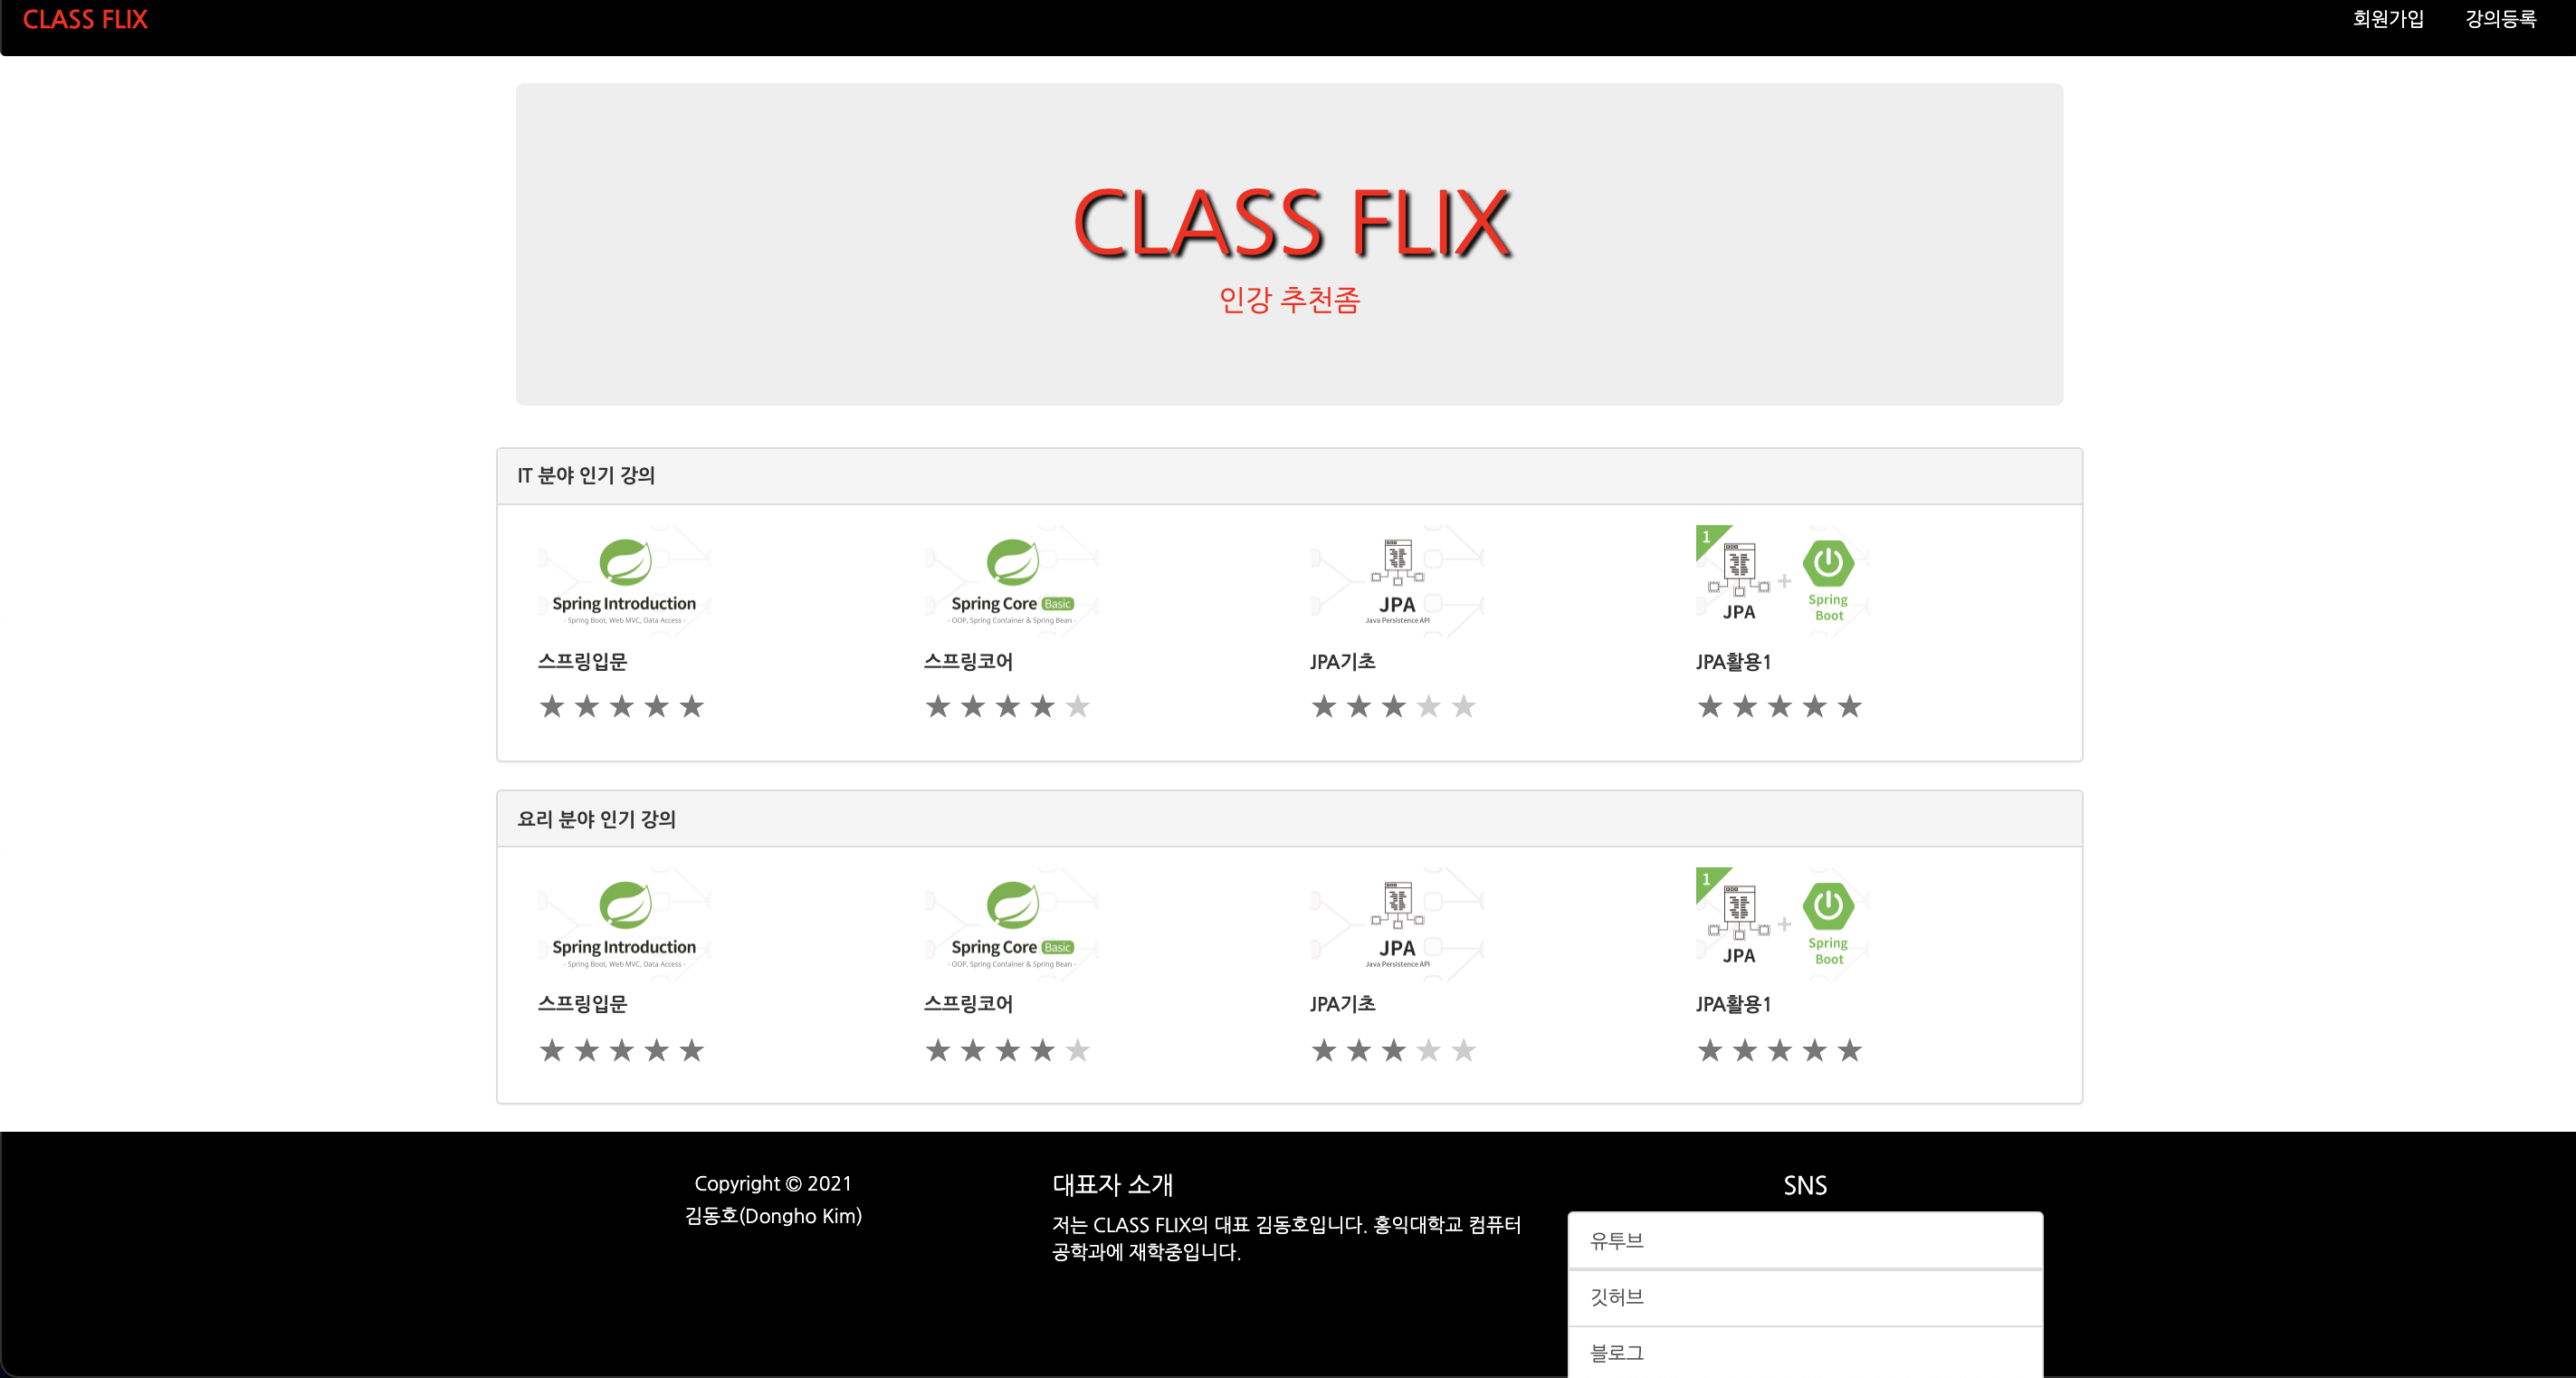
홈 화면에서 아래와 같이 구현하려고 한다.
홈화면에서는 강의 목록을 불러오는 쿼리가 필요하다.
Controller
컨트롤러에서 LectureService를 호출하고 모든 lectrue List를 받는다.
그리고 view에 lectures List를 뿌려준다.
또한, 홈화면 에서는 lecture의 모든 정보가 필요한 것이 아니므로
view에 의존하는 HomeLectureDto를 만들어서 넘길 것이다.
package dongho.classflix.controller;

import dongho.classflix.controller.dto.HomeLectureDto;
import dongho.classflix.domain.Lecture;
import dongho.classflix.service.LectureService;
import dongho.classflix.service.MemberService;
import lombok.RequiredArgsConstructor;
import lombok.extern.slf4j.Slf4j;
import org.springframework.stereotype.Controller;
import org.springframework.ui.Model;
import org.springframework.web.bind.annotation.GetMapping;
import org.springframework.web.bind.annotation.RequestMapping;

import java.util.ArrayList;
import java.util.List;

@Controller
@RequiredArgsConstructor
@Slf4j
public class HomeController {

    private LectureService lectureService;

    @GetMapping("/")
    public String home(Model model) {
        List<Lecture> lectures = lectureService.findAll();

        List<HomeLectureDto> HomeLectureDtos = new ArrayList<>();

        for (int i = 0; i < lectures.size(); i++) {
            HomeLectureDto lectureDto = new HomeLectureDto();
            lectureDto.setLectureName(lectures.get(i).getLectureName());
            HomeLectureDtos.add(lectureDto);
        }

        model.addAttribute("lectures", HomeLectureDtos);
        return "home";
    }
}
home.html
간단한 구현을 위해서 카테고리(IT 분야 인기 강의) 는 텍스트를 미리 박아놓았다.
별점도 표시하지 않고 일단 강의의 이름들만 먼저 받아보려고 한다.
th:each와
th:text를 이용해서 강의 개수만큼 반복하여 출력하려고 한다.
반복을 시작할 태그위치에서 th:each를 해주면 된다.
<!DOCTYPE HTML>
<html xmlns:th="http://www.thymeleaf.org">
<head th:replace="fragments/header :: header">
</head>
<body>
<style type="text/css">
    .jumbotron {
        text-shadow: black 0.2em 0.2em 0.2em;
        color: red;
    }

    .lecture-images {
        width: 128px;
        height: 83px;
    }
    .panel-heading {
        font-weight: bold;
        background-color: white;
    }
    .lecture-title {
        font-weight: bold;
    }
    .star_rating {font-size:0; letter-spacing:-4px;}
    .star_rating a {
        font-size:22px;
        letter-spacing:0;
        display:inline-block;
        margin-left:5px;
        color:#ccc;
        text-decoration:none;
    }
    .star_rating a:first-child {margin-left:0;}
    .star_rating a.on {color:#E1BC3F;}

</style>
<div th:replace="fragments/bodyHeader :: bodyHeader" />

<div class="container">
    <div class="jumbotron">
        <h1 class="text-center">CLASS FLIX</h1>
        <p class="text-center" style="text-shadow: none">인강 추천좀</p>
    </div>
    <div class="row">
        <div class="panel panel-default">
            <div class="panel-heading">IT 분야 인기 강의</div>
            <div class="panel-body">
                <div class="col-md-3" th:each="lecture : ${lectures}">
                    <img class="lecture-images" src="/images/springInstroduction.png" alt="스프링입문">
                    <h5 th:text="${lecture.getLectureName()}" class="lecture-title">스프링입문</h5>
                    <p class="star_rating">
                        <a href="#" class="on">★</a>
                        <a href="#" class="on">★</a>
                        <a href="#" class="on">★</a>
                        <a href="#" class="on">★</a>
                        <a href="#" class="on">★</a>
                    </p>
                </div>
            </div>
        </div>
    </div>
</div>

<div th:replace="fragments/footer :: footer" />

<script src="https://code.jquery.com/jquery-3.1.1.min.js"></script>

</body>
</html>
SpringBoot가 실행되면 데이터베이스에 초기 데이터를 자동으로 넣기 위해
InitDB 클래스도 작성했다.
package dongho.classflix;

import dongho.classflix.domain.Lecture;
import lombok.RequiredArgsConstructor;
import org.springframework.stereotype.Component;
import org.springframework.transaction.annotation.Transactional;

import javax.annotation.PostConstruct;
import javax.persistence.EntityManager;
import java.time.LocalDateTime;

@Component
@RequiredArgsConstructor
public class InitDB {

    private final InitService initService;

    @PostConstruct
    public void init() {
        initService.dbInit1();
    }


    @Component
    @Transactional
    @RequiredArgsConstructor
    static class InitService {
        private final EntityManager em;

        public void dbInit1() {
            Lecture lecture1 = new Lecture("스프링입문", "김영한", "좋아요", LocalDateTime.now());
            Lecture lecture2 = new Lecture("스프링코어", "김영한", "나빠요", LocalDateTime.now());
            Lecture lecture3 = new Lecture("jpa기초", "김영한", "그냥그래요", LocalDateTime.now());
            Lecture lecture4 = new Lecture("jpa활용", "김영한", "좋아요", LocalDateTime.now());

            em.persist(lecture1);
            em.persist(lecture2);
            em.persist(lecture3);
            em.persist(lecture4);

        }
    }
}
문제발생
그런데,
List<Lecture> lectures = lectureService.findAll(); 에서 NullPointerException이 발생했다.

문제해결
먼저
데이터베이스에 InitDB가 잘 들어가있나 확인해보았다.

InitDB에서 넣은 데이터 그대로 들어가있다.
그 다음 lectureService의 로직을 검사했다.
    @Test
    public void 강의조회() throws Exception {
        //given
        Lecture lecture1 = new Lecture("스프링입문", "김영한", "좋아요", LocalDateTime.now());
        Lecture lecture2 = new Lecture("스프링코어", "김영한", "나빠요", LocalDateTime.now());
        Lecture lecture3 = new Lecture("jpa기초", "김영한", "그냥그래요", LocalDateTime.now());
        Lecture lecture4 = new Lecture("jpa활용", "김영한", "좋아요", LocalDateTime.now());

        //when
        List<Lecture> lectures = lectureService.findAll();

        //then
        assertThat(lectures.get(0).getLectureName()).isEqualTo(lecture1.getLectureName());
        assertThat(lectures.get(1).getLectureName()).isEqualTo(lecture2.getLectureName());
        assertThat(lectures.get(2).getLectureName()).isEqualTo(lecture3.getLectureName());
        assertThat(lectures.get(3).getLectureName()).isEqualTo(lecture4.getLectureName());
    }

LectureService.findAll의 로직도 정상이었다.
이제 의심할 만한 사항은
- Lecture List 초기화할때 findAll를 바로 넣어주는것
- 조회로직의 결과값이 null일경우 스프링에서 내는 오류
- home controller에서 불러서??
Lecture List 초기화할때 findAll를 바로 넣어주는것
...
    @GetMapping("/")
    public String home(Model model) {
        List<Lecture> lectures = new ArrayList<>();
        lectures = lectureService.findAll();
...
이렇게 lectures는 new ArrayList<>();로 미리 초기화 하고
그 다음에 findAll을 넣어보았다.
lectures = lectureService.findAll(); 에서 NPE가 터진다.
그러면 lectureService.findAll(); 에서 문제가 있는듯 하다
스프링에서 조회결과가 null 일때 예외처리가 안되어있어 내는 오류?
findAll 로직을 수행하는 부분에서 NPE에 대한 예외처리를 추가했다.
    public List<Lecture> findAll() {
        List<Lecture> lectures = em.createQuery("select l from Lecture l", Lecture.class)
                .getResultList();
        if (!lectures.isEmpty()) {
            throw new NullPointerException("조회 결과가 없습니다");
        }
        return lectures;
    }
그래도 오류발생..
home controller에서 불러서??
home controller에서는 아무 쿼리도 수행하지 않게 해보고 다른 uri에서 service 로직을 실행해본다.
package dongho.classflix.controller;

import dongho.classflix.controller.dto.HomeLectureDto;
import dongho.classflix.domain.Lecture;
import dongho.classflix.service.LectureService;
import lombok.RequiredArgsConstructor;
import lombok.extern.slf4j.Slf4j;
import org.springframework.stereotype.Controller;
import org.springframework.ui.Model;
import org.springframework.web.bind.annotation.GetMapping;

import java.util.ArrayList;
import java.util.List;

@Controller
@RequiredArgsConstructor
@Slf4j
public class LectureController {

    private final LectureService lectureService;

    @GetMapping("/lectures")
    public String lectures(Model model) {
        List<Lecture> lectures = new ArrayList<>();
        lectures = lectureService.findAll();

        List<HomeLectureDto> HomeLectureDtos = new ArrayList<>();

        for (int i = 0; i < lectures.size(); i++) {
            HomeLectureDto lectureDto = new HomeLectureDto();
            lectureDto.setLectureName(lectures.get(i).getLectureName());
            HomeLectureDtos.add(lectureDto);
        }

        for (HomeLectureDto homeLectureDto : HomeLectureDtos) {
            log.info(homeLectureDto.getLectureName());
        }

        model.addAttribute("lectures", HomeLectureDtos);
        return "homeLectures";
    }


}
데이터가 잘 나온다!!
home controller와 다른 컨트롤러의 차이가 뭘까?
-> home controller와 다른 컨트롤러의 차이는 없다.
그냥 의존성 주입이 안되어있어서 발생한 오류이다.

코드를 잘 보면 lectureService에 회색표시가 되어있다.
@RequiredArgsConstructor는 final이 붙어있어야 의존성 주입(@Autowired)을 자동으로 해주지만 나는 final을 붙이지 않았다.

final을 붙이니 @RequiredArgsConstructor에서 @Autowired를 붙여주어 제대로 의존성 주입이 된다.
강의 명을 잘 읽어온다.

별점기능구현
별점도 lecture에 들어있는 데이터의 개수만큼 뿌려주고 싶다.
thymeleaf의 반복자를 이용해서 해결해보자.
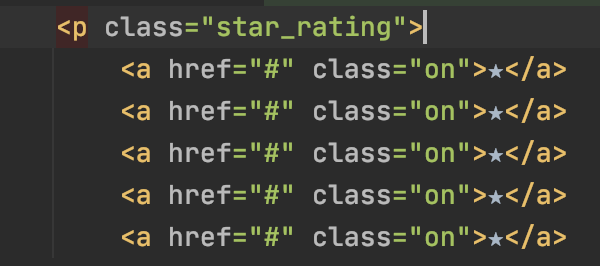
이렇게 되어있던 html을

lecture의 평균 별점만큼 반복해서 출력하도록 한다.
<!DOCTYPE HTML>
<html xmlns:th="http://www.thymeleaf.org">
<head th:replace="fragments/header :: header">
</head>
<body>
<style type="text/css">
    .jumbotron {
        text-shadow: black 0.2em 0.2em 0.2em;
        color: red;
    }

    .lecture-images {
        width: 128px;
        height: 83px;
    }
    .panel-heading {
        font-weight: bold;
        background-color: white;
    }
    .lecture-title {
        font-weight: bold;
    }
    .star_rating {font-size:0; letter-spacing:-4px;}
    .star_rating a {
        font-size:22px;
        letter-spacing:0;
        display:inline-block;
        margin-left:5px;
        color:#ccc;
        text-decoration:none;
    }
    .star_rating a:first-child {margin-left:0;}
    .star_rating a.on {color:#E1BC3F;}

</style>
<div th:replace="fragments/bodyHeader :: bodyHeader" />

<div class="container">
    <div class="jumbotron">
        <h1 class="text-center">CLASS FLIX</h1>
        <p class="text-center" style="text-shadow: none">인강 추천좀</p>
    </div>
    <div class="row">
        <div class="panel panel-default">
            <div class="panel-heading">IT 분야 인기 강의</div>
            <div class="panel-body">
                <div class="col-md-3" th:each="lecture : ${lectures}">
                    <img class="lecture-images" src="/images/springInstroduction.png" alt="스프링입문">
                    <h5 th:text="${lecture.getLectureName()}" class="lecture-title">스프링입문</h5>
                    <p class="star_rating">
                        <a href="#" class="on" th:each="num : ${#numbers.sequence(0, lecture.getAverageRating()-1)}">★</a>
                    </p>
                </div>
            </div>
        </div>
    </div>
</div>

<div th:replace="fragments/footer :: footer" />

<script src="https://code.jquery.com/jquery-3.1.1.min.js"></script>

</body>
</html>

이제 사진만 설정하면 홈 화면은 끝이다.
'Project > ClassFlix' 카테고리의 다른 글
| [ClassFlix] EP 8. view 페이지 제작과 컨트롤러 연결 - 4 (0) | 2021.05.04 |
|---|---|
| [ClassFlix] EP 7. view 페이지 제작과 컨트롤러 연결 - 3 (0) | 2021.04.30 |
| [ClassFlix] EP 5. view 페이지 제작과 컨트롤러 연결 - 1 (0) | 2021.04.27 |
| [ClassFlix] EP 4. domain, repository, service 계층별 설계 및 구현 (0) | 2021.04.26 |
| [ClassFlix] EP 3. 도메인 설계와 테이블 생성 (0) | 2021.04.21 |